
How Artificial Turf Is Installed: The 11 Steps That Matter
Most people picture artificial turf as a green carpet that gets rolled out over dirt and stapled down. The green part you see is the smallest part of the job. What decides whether your lawn stays flat, drains cleanly, and lasts a decade is everything underneath it, most of which disappears from view the moment the turf goes on top.
QUICK ANSWER: A proper install is a layered process: strip the old surface, grade for slope and drainage, build and compact an aggregate base in stages, top it with a leveling layer, then lay, seam, anchor, infill, and groom the turf. The base is roughly 70 percent of the labor and nearly all of the long-term performance.
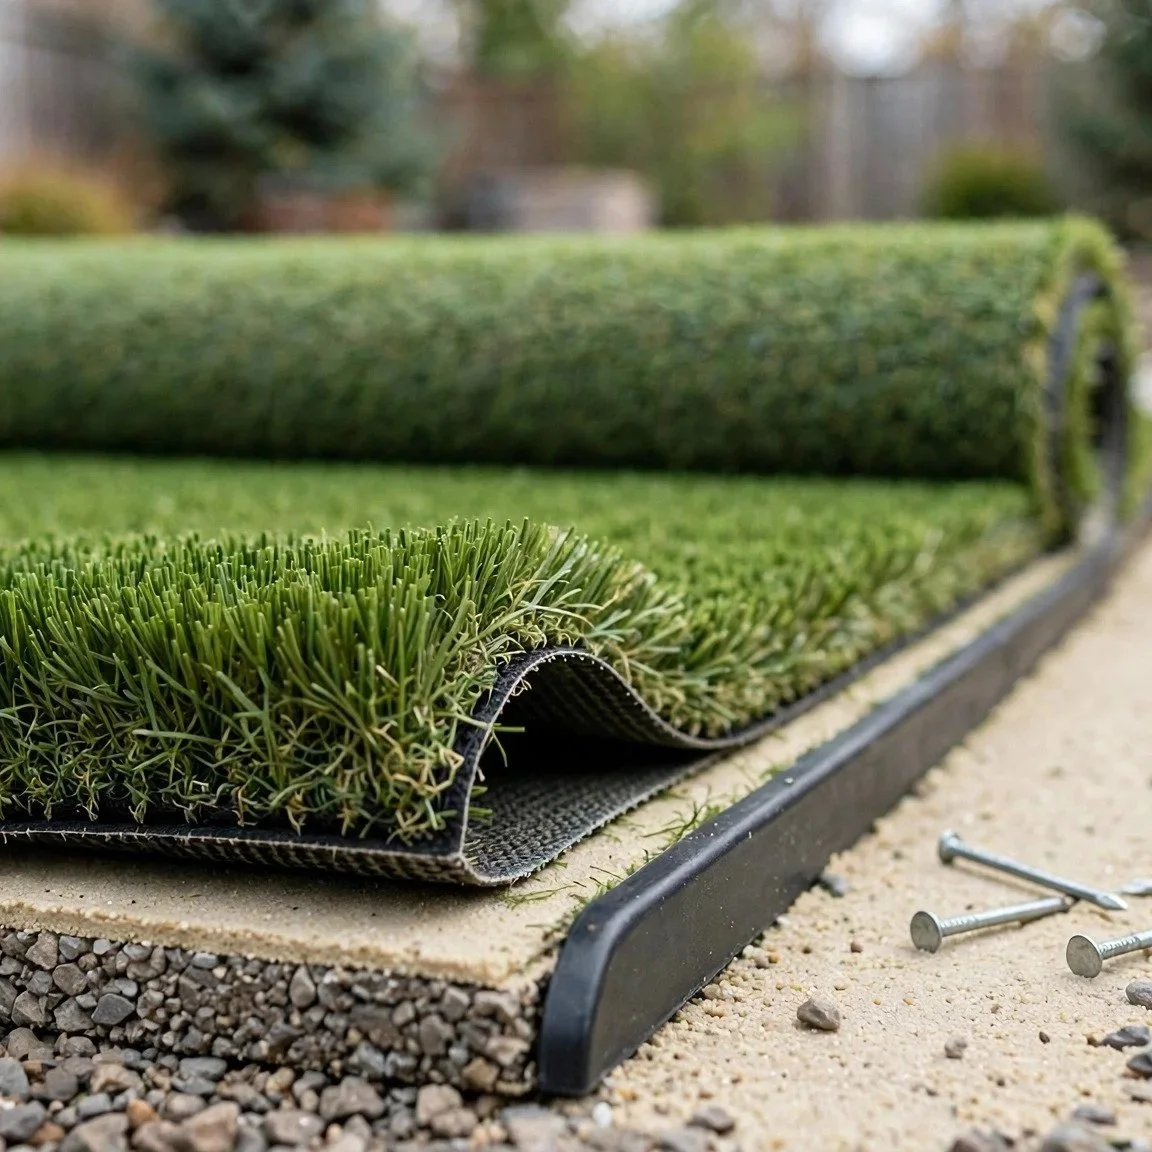
The Base Is Most of the Job
A turf lawn is only as good as the compacted platform it sits on. A house resists settling because it stands on a footing, not because the walls are strong. Synthetic grass behaves the same way: the visible blades stay flat and even only when the graded, compacted base beneath them refuses to shift.
When the base is rushed, the failures show up months later, and they all trace back to the same skipped step. Loose or uneven fill settles at different rates, so the surface develops low spots and dips. Poor grading traps water instead of moving it, and pooling breeds odor and standing puddles after rain. Skimp on compaction and the turf ripples into wrinkles as the ground shifts under foot traffic. None of these are turf problems. They are base problems wearing a green cover.
That is why an experienced crew spends most of the project on the ground you will never see. The steps below walk through a full install in order, but keep the weighting in mind: by the time the turf itself comes out of the roll, the hard part is already done.
Step One: Remove the Existing Surface
The crew strips out old grass, roots, and the top layer of soil, usually two to four inches deep depending on what is being removed and how much base needs to fit. Living grass has to go completely, because organic matter left behind decomposes, settles, and can push weeds up through seams later.
WARNING: Before any digging starts, call 811 to have underground utilities located and marked. It is a free service, and hitting a gas, water, or electrical line while excavating is both dangerous and expensive. This step is not optional on any dig.
Step Two: Grade for Slope and Drainage
With the area cleared, the crew shapes the sub-grade, so water has somewhere to go. A gentle, deliberate slope, often around one to two percent, or roughly a quarter inch of fall per foot, directs runoff away from the house and toward a drain, a swale, or a permeable edge.
Why slope matters: Turf backing is perforated to let water pass through, but water still needs a downhill path once it reaches the base. Grade the surface flat, and water sits in the aggregate instead of leaving it. On a lawn that gets pet use, standing moisture is the single biggest cause of lingering odor, so this quiet step does more for smell control than any spray ever will.
Step Three: Build the Aggregate Base in Lifts
Now the platform goes in. The crew brings in crushed rock or road base, commonly a mix like class II road base or decomposed granite, and spreads it across the graded area. This layer typically runs three to four inches thick, more for high-traffic or vehicle-adjacent areas.
Critically, the base goes down in lifts, meaning thin layers of an inch or two at a time rather than one deep dump. Each lift is spread, dampened, and compacted before the next goes on. A plate compactor, a heavy vibrating machine, presses each layer into a dense, locked mass. That machine and the loaded wheelbarrows of rock are real injury risks, which is one reason larger installs belong with a crew that handles the weight and the equipment daily.
Why compaction cannot be skipped: Uncompacted rock has air gaps between the stones. Under foot traffic, those gaps slowly close and the surface drops, creating the exact dips and wrinkles a good install is meant to prevent. Compacting in lifts drives the air out layer by layer, so the finished base is already as settled as it is going to get before a single blade of turf touches it.
Step Four: Add the Leveling Layer
On top of the compacted rock goes a thin finishing course, often a fine material like sharp sand or a decomposed granite screening, screeded smooth to iron out any minor high and low spots the coarse base left behind. The crew compacts this too, then checks it with a level and a straightedge.
This is the layer that gives turf its plush, even feel underfoot. Coarse base alone would telegraph every stone through the backing; the leveling course creates a smooth, firm bed so the surface reads flat and consistent when you walk on it.
Step Five: Lay the Weed Barrier Where Needed
Where weed intrusion is a concern, a geotextile weed barrier fabric goes down over the base before the turf. It blocks anything from rooting up through the seams while still letting water drain through.
The barrier is not automatic on every job. Over a deep, well-compacted mineral base, weeds have little to grow in, and some installers skip the fabric to preserve maximum drainage. It earns its place along bed edges, around existing plantings, or where the base is shallower.
Step Six: Roll Out and Let the Turf Acclimate
The turf arrives in large rolls, and it needs time to relax. Laid out in the sun and left for a few hours to a full day, the material loosens, and the backing releases the memory of being tightly wound. Installers call this acclimation, and skipping it is a classic rookie error.
Turf that goes down straight off a cold, tight roll will expand afterward, and expansion after the edges are locked is exactly what produces bubbles and wrinkles. Letting it settle first means the piece you anchor is the size it wants to stay.
Step Seven: Seam the Panels With Matching Grain
Synthetic grass blades all lean in one direction, called the grain. When two panels meet, both pieces have to face the same way, or the seam shows up as a visible line where light catches the blades at different angles.
How a clean seam is made: The crew trims the factory edge off each piece, butts the two panels together blade to blade without overlapping, and joins them from underneath with seaming tape and adhesive or seam staples. Done right, the grain runs continuously across the joint, and the seam vanishes into the surface. Getting grain direction wrong is one of the most common reasons a self-installed lawn looks patchy, and it cannot be fixed without re-seaming.
Step Eight: Secure the Edges
With seams set, the turf gets anchored. Nails or galvanized turf staples, usually five to six inches long, are driven around the full perimeter and along the seams every few inches, tacking the backing to the compacted base beneath.
Along beds, walkways, and open edges, many installs add bender board, a flexible edging that holds a crisp line and keeps the base material from spilling out over time. Proper anchoring is what keeps the whole surface from creeping or lifting at the corners once people and pets start using it.
Step Nine: Brush and Add Infill
Once the turf is fixed in place, the crew power-brooms the blades upright, then spreads infill. Infill is granular material, silica sand, coated sand, or an antimicrobial product, dropped in with a spreader and worked down to the base of the blades.
What infill actually does: Infill is not filler. It weighs the turf so it lies flat and resists ripples; it holds the blades standing upright instead of matting down; and it protects the backing from sun exposure. A weighted, brushed surface simply lasts longer and looks fuller than bare turf. If a lawn ever feels hot underfoot, that heat cuts both ways with the seasons, and infill choice is one of the levers that influences surface temperature either direction.
Step Ten: Groom, and the Pet-Yard Differences
The final pass is grooming: a second brushing against the grain to stand every blade up and fully seat the infill, then a walk-through to check seams, edges, and drainage. A hose test confirms water leaves the surface instead of pooling.
Pet installations change a few of the earlier steps rather than adding new ones. The base is often built with extra drainage capacity so urine flushes straight through instead of sitting. The infill is typically an antimicrobial or deodorizing product that resists the bacteria responsible for odor, rather than plain sand. Some crews add a drainage layer or a permeable membrane beneath the turf as well. The blades and the seaming are the same; the water management underneath is what gets upgraded.
How a Good Install Prevents the Common Failures
Walk back through the layers and every long-term complaint maps to a specific step. Wrinkles come from turf that was not acclimated or a base that was not compacted. Weeds come from organic matter left in the soil or a missing barrier at the edges. Pooling and odor come from a flat grade with nowhere for water to go. Visible seams come from mismatched grain.
None of those are flaws in the turf product. They are shortcuts taken in the base and the prep, which is exactly why the invisible two-thirds of the job is the part worth getting right. A lawn built on a compacted, well-graded platform stays flat, drains clean, and holds its look for years.
Frequently Asked Questions
A typical residential lawn is often completed in one to three days, and many standard-size yards finish in a single day. The variable is rarely the turf; it is the base: heavy clay or caliche soil that resists digging, or a yard needing extensive re-grading, can add a day on its own before any green goes down.
Yes, and the process changes. Over concrete, you skip the excavation and aggregate base and instead glue the turf directly with an outdoor adhesive, or float a thin drainage pad first. The one requirement the slab must meet is drainage: it needs an existing slope or weep holes so water is not trapped between the turf backing and the concrete.
Pile height is how tall the blades stand, measured in inches, and it is a look-and-feel choice. Face weight is the ounces of yarn per square yard, and it is the durability number: a higher face weight means more fiber packed in, which resists matting far better under heavy foot and pet traffic than a tall but thin turf.
Yes. Naturally hard native soil is not the same as an engineered base. Imported crushed rock has to be compacted so its stones interlock and drain predictably, and even firm sub-grade gets a compaction pass. Relying on undisturbed dirt skips the drainage layer entirely and is a frequent cause of pooling later.
Around a quarter inch of fall per linear foot, roughly a one to two percent grade, is the common target. Flatter than that and water lingers in the base; much steeper and the surface starts to feel and look like a ramp. On perfectly flat yards with no runoff point, installers sometimes build in a French drain or a dry well beneath the base to carry water off.
A wrinkle usually means the turf expanded after being anchored, from skipped acclimation or heat. The repair is to pull the affected nails or staples, let the material relax and lie flat again, trim any excess at the edge, and re-secure it. If the bubble traces to a soft spot in the base, the fix has to go deeper: lift the turf, re-compact or re-level that section, and re-lay it.
Get a free estimate on a lawn built base-first — flat, draining, and made to last. Turfscapes of Arizona serves Phoenix, Scottsdale, and the Valley. ROC #293110. Call (602) 884-8760.